通过控制cred结构体来获得权限是kernel pwn中比较基础的做法,结合一些漏洞往往可以造成意想不到的结果。
前置知识
内核
内核是操作系统的核心,目的是为上层提供一个接口,和CPU进行交互,方式就是通过设置各种CPU所需要的结构,让CPU能够提供相应的功能,比如设置虚拟内存所需要的一些结构,使得CPU能够顺利识别,从而提供虚拟内存功能。和操作系统进行交互可以通过系统调用等方式实现。
slub重用
其作用是为了减少slub的种类,比如我有个kmalloc-8类型的slub,里面每个对象大小是8,而我某个驱动想申请自己所属的slub,其对象大小是6,系统实际把kmalloc-8这个类型的slub返回给了驱动,之后驱动中分配对象时实际上就是从kmalloc-8中分配对象,这就是slub重用,将相近大小的slub共用一个slub类型,虽然会造成一些内碎片,但是大大减少了slub种类过多以及减少使用了跟多的内存。slab分配器严格按照cache去区分,不同cache的无法分配在一页内,slub分配器则较为宽松,不同cache如果分配相同大小,可能会在一页内。
题目分析
拿到一个压缩包 babydriver.tar,解压之后获得三个文件。
其中
- boot.sh : 启动脚本
- bzImage : 压缩的内核映像
- rootfs.cpio : 文件系统
接着解压 rootfs.cpio1
2
3
4mkdir fs
cd fs
cp ../rootfs.cpio ./
cpio -idmv < rootfs.cpio
当然在一些系统中也可以直接右键解压。
在其中找到init文件1
2
3
4
5
6
7
8
9
10
11
12
13
14
15
16
17
18
19
mount -t proc none /proc
mount -t sysfs none /sys
mount -t devtmpfs devtmpfs /dev
chown root:root flag
chmod 400 flag
exec 0</dev/console
exec 1>/dev/console
exec 2>/dev/console
insmod /lib/modules/4.4.72/babydriver.ko
chmod 777 /dev/babydev
echo -e "\nBoot took $(cut -d' ' -f1 /proc/uptime) seconds\n"
setsid cttyhack setuidgid 1000 sh
umount /proc
umount /sys
poweroff -d 0 -f
可以看到内核版本4.4.72,加载了 babydriver.ko 文件。
# checksec --file babydriver.ko
Arch:     amd64-64-little
RELRO:    No RELRO
Stack:    No canary found
NX:       NX enabled
PIE:      No PIE (0x0)
接着进行RE。
可以看到在对设备进行open操作时,相关数据是存储在bss段上面。如果再次打开一个,就会把第一次的数据覆盖掉。

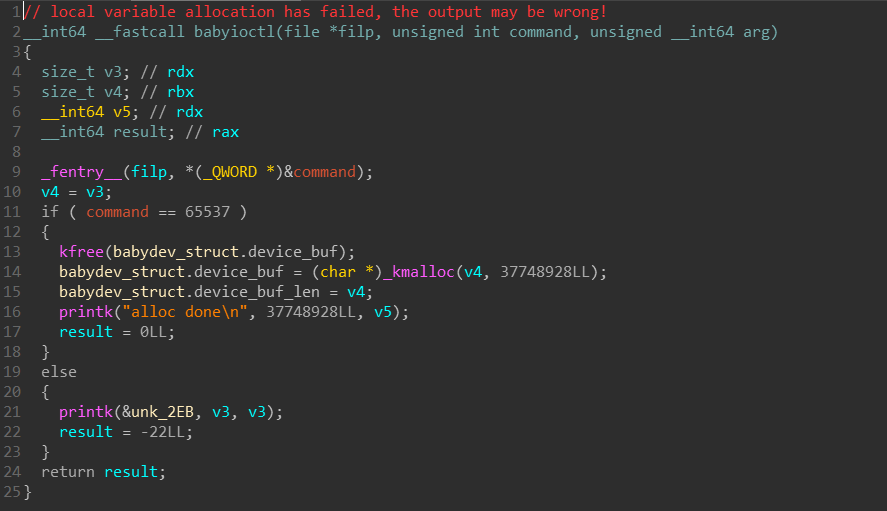
command为0x10001时,可以改变全局变量。
往全局变量里写buffer的n个长度。
以下是cred结构体的描述1
2
3
4
5
6
7
8
9
10
11
12
13
14
15
16
17
18
19
20
21
22
23
24
25
26
27
28
29
30
31
32
33
34
35
36
37
38
39struct cred {
atomic_t usage;
atomic_t subscribers; /* number of processes subscribed */
void *put_addr;
unsigned magic;
kuid_t uid; /* real UID of the task */
kgid_t gid; /* real GID of the task */
kuid_t suid; /* saved UID of the task */
kgid_t sgid; /* saved GID of the task */
kuid_t euid; /* effective UID of the task */
kgid_t egid; /* effective GID of the task */
kuid_t fsuid; /* UID for VFS ops */
kgid_t fsgid; /* GID for VFS ops */
unsigned securebits; /* SUID-less security management */
kernel_cap_t cap_inheritable; /* caps our children can inherit */
kernel_cap_t cap_permitted; /* caps we're permitted */
kernel_cap_t cap_effective; /* caps we can actually use */
kernel_cap_t cap_bset; /* capability bounding set */
kernel_cap_t cap_ambient; /* Ambient capability set */
unsigned char jit_keyring; /* default keyring to attach requested
* keys to */
struct key __rcu *session_keyring; /* keyring inherited over fork */
struct key *process_keyring; /* keyring private to this process */
struct key *thread_keyring; /* keyring private to this thread */
struct key *request_key_auth; /* assumed request_key authority */
void *security; /* subjective LSM security */
struct user_struct *user; /* real user ID subscription */
struct user_namespace *user_ns; /* user_ns the caps and keyrings are relative to. */
struct group_info *group_info; /* supplementary groups for euid/fsgid */
struct rcu_head rcu; /* RCU deletion hook */
};
cred结构在每一个进程中都有一个,并且保存了该进程的权限信息。
利用流程
- 打开两次fd1,fd2。
- 通过fd1,修改buf_len为CRED_SIZE。
- 关闭fd1,此时driver_buf被kfree掉。
- fork一个进程,cred结构体被分配到driver_buf位置。
- 通过fd2往driver_buf里面写0,覆盖到egid为止,此时该进程权限被认为是root。
cred结构体大小
可以通过源码直接算出来,也可以写一个demo测一下,这里写个小demo。1
2
3
4
5
6
7
8
9
10
11
12
13
14
15
16
17
18
struct cred c1;
static int hello_init(void)
{
printk("<1> Hello world!\n");
printk("size of cred : %d \n",sizeof(c1));
return 0;
}
static void hello_exit(void)
{
printk("<1> Bye, cruel world\n");
}
module_init(hello_init);
module_exit(hello_exit);
#cat Makefile
CURR_PATH   = $(shell pwd)
KERNEL_PATH = /home/griffin/kernel/linux-4.4.72
BUILD_PATH  = $(CURR_PATH)/build
obj-m := credSize.o
default:
    make -C $(KERNEL_PATH) M=$(CURR_PATH) modules
.PHONY:clean
clean:
    @$(RM) *.o  *.mod.* Module.* modules.*
大小为168
gcc -o exp -static exp.c
把exp放进rootfs再打包成rootfs.cpio
find . | cpio -o --format=newc > ../rootfs.cpio
运行boot.sh,运行exp后get root。
Exploit
1 |
|
参考链接
https://www.anquanke.com/post/id/86490
https://www.cnblogs.com/tolimit/p/4654109.html